สร้าง Live Chat ด้วย Bootstrap
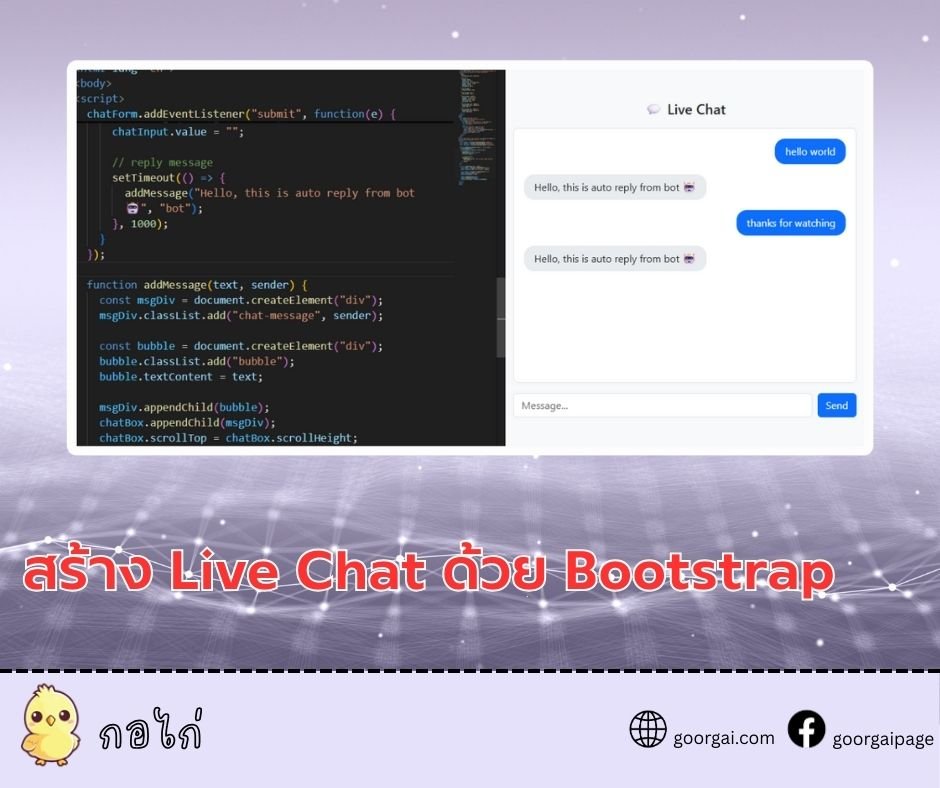
หน้า Live Chat ด้วย Bootstrap ที่คุณสามารถนำไปปรับใช้ได้ทันที โดยจะใช้โครงสร้างพื้นฐานของ Bootstrap (เวอร์ชัน 5) พร้อม JavaScript สำหรับการส่งข้อความ
คำอธิบาย
- ใช้ Bootstrap สำหรับ layout และปุ่ม
- มี กล่องข้อความ (chat-box) ที่เลื่อนอัตโนมัติเมื่อมีข้อความใหม่
- มี ฟอร์มส่งข้อความ ที่ผู้ใช้พิมพ์แล้วกดส่ง
- มีฟังก์ชัน สำหรับเพิ่มข้อความทั้งฝั่งผู้ใช้และบอท
- จำลองการตอบกลับจากบอทด้วย
หน้าเว็บตัวอย่าง “Live Chat” แบบง่ายที่ใช้ Bootstrap สำหรับสไตล์ และ JavaScript ธรรมดาเพื่อจัดการข้อความแชท ผู้ใช้พิมพ์ข้อความ กดส่ง แล้วระบบจะแสดงข้อความของผู้ใช้และตอบกลับอัตโนมัติจากบอทผ่าน setTimeout
Html structure and bootstrap setup
- Document setup: ใช้ และตั้ง lang="th" เพื่อบอกว่าเนื้อหาเป็นภาษาไทย พร้อม meta charset และ viewport เพื่อรองรับการแสดงผลบนอุปกรณ์มือถือ
- Bootstrap CSS: โหลดผ่าน CDN (link ไปยัง bootstrap@5.3.2) เพื่อใช้คลาสสำเร็จรูป (เช่น container, row, col-md-6, btn, form-control)
- Layout:
- Container: <div class="container py-5"> สร้างพื้นที่มีระยะขอบแนวตั้ง
- Grid: <div class="row justify-content-center"> จัดกึ่งกลาง และ <div class="col-md-6"> กำหนดความกว้างคอลัมน์
- Title: <h4> แสดงหัวข้อ “Live Chat”
- Chat box: <div id="chatBox" class="chat-box mb-3"> เป็นกล่องโชว์ข้อความ
- Form: <form id="chatForm" class="d-flex"> มีช่องกรอก <input id="chatInput"> และปุ่ม<button type="submit">
Css styles for chat ui
- Body background: ตั้งพื้นหลังอ่อนด้วย #f8f9fa
- Chat box:
- ขนาดและสกรอล: height: 400px; overflow-y: auto; กำหนดความสูงคงที่และเลื่อนแนวตั้งได้
- กรอบและโค้ง: border, border-radius และ padding สร้างกล่องสวยอ่านง่าย
- พื้นหลัง: background: #fff ตัดกับพื้นหลังหน้าหลัก
- Chat message:
- ระยะห่าง: .chat-message { margin-bottom: 1rem; }
- จัดชิด: .chat-message.user { text-align: right; } ข้อความผู้ใช้ชิดขวา
- Bubble:
- รูปร่าง: display: inline-block; padding; border-radius: 1rem; max-width: 70% ทำเป็นฟองข้อความไม่ยาวเกิน
- สีตามผู้ส่ง:
- User: พื้นหลังน้ำเงิน (#0d6efd) ตัวอักษรขาว
- Bot: พื้นหลังเทาอ่อน (#e9ecef) ตัวอักษรดำ
JavaScript elements and references
- Element references:
- chatBox: กล่องที่ใช้แสดงข้อความทั้งหมด
- chatForm: ฟอร์มส่งข้อความ
- chatInput: ช่องข้อความที่ผู้ใช้พิมพ์
- Bootstrap JS: โหลด bundle ผ่าน CDN เพื่อให้ component ของ Bootstrap ทำงานได้ (แม้โค้ดนี้ไม่ได้ใช้ JS ของ Bootstrap โดยตรง ก็ปลอดภัยที่จะโหลดไว้)
Form submit handling and auto reply
- Prevent default submit:
- เหตุผล: ป้องกันฟอร์มรีเฟรชหน้า (e.preventDefault()) เพื่อให้การส่งข้อความเกิดในหน้าเดียว
- Read and validate input:
- Trim: chatInput.value.trim() ตัดช่องว่างหัว-ท้าย
- Check empty: ถ้าไม่ว่างจึงดำเนินการต่อ
- Add user message:
- Call: addMessage(message, "user") สร้างและใส่ข้อความของผู้ใช้ลงใน chatBox
- Clear input: ตั้งค่า chatInput.value = "" ให้ช่องว่างพร้อมพิมพ์ใหม่
- Auto reply:
- Delay: ใช้ setTimeout 1000 ms เพื่อเลียนแบบการตอบกลับที่มีหน่วงเวลา
- Add bot message: addMessage("Hello, this is auto reply from bot 🤖", "bot")
Message creation and scrolling behavior
- Function addMessage(text, sender):
- Create wrapper:
- msgDiv: document.createElement("div") แล้ว classList.add("chat-message", sender) ใส่คลาสพื้นฐานและชนิดผู้ส่ง (user หรือ bot) เพื่อให้ CSS จัดตำแหน่งและสีถูกต้อง
- Create bubble:
- bubble: สร้าง <div> สำหรับข้อความจริง ใส่คลาส bubble และตั้ง textContent = text เพื่อป้องกัน HTML injection (ไม่ใช้ innerHTML)
- Append:
- Structure: ใส่ bubble เข้า msgDiv แล้วใส่ msgDiv เข้า chatBox
- Auto scroll:
- Scroll to bottom: chatBox.scrollTop = chatBox.scrollHeight; เพื่อให้มุมมองเลื่อนไปที่ข้อความล่าสุดทันที
- Create wrapper:
- ผลลัพธ์: ทุกข้อความจะถูกจัดรูปแบบและเลื่อนให้เห็นข้อความล่าสุดโดยอัตโนมัติ
Behavior and user experience notes
- Right-aligned user messages: ทำให้ฝั่งผู้ใช้ชัดเจนและแยกจากบอท
- Consistent bubble width: จำกัดให้ไม่เกิน 70% ของกล่องเพื่อความอ่านง่ายและคงรูปแบบแชท
- Graceful bot reply delay: หน่วงเวลา 1 วินาทีสร้างความรู้สึก “มีการประมวลผล” ไม่ทันทีเกินไป
- Security consideration: ใช้ textContent แทน innerHTML ลดความเสี่ยง XSS จากข้อความที่พิมพ์เข้ามา
body {
      background-color: #f8f9fa;
    }
    .chat-box {
      height: 400px;
      overflow-y: auto;
      border: 1px solid #dee2e6;
      border-radius: .5rem;
      padding: 1rem;
      background: #fff;
    }
    .chat-message {
      margin-bottom: 1rem;
    }
    .chat-message.user {
      text-align: right;
    }
    .chat-message .bubble {
      display: inline-block;
      padding: .5rem 1rem;
      border-radius: 1rem;
      max-width: 70%;
    }
    .chat-message.user .bubble {
      background-color: #0d6efd;
      color: #fff;
    }
    .chat-message.bot .bubble {
      background-color: #e9ecef;
      color: #212529;
}<div class="container py-5">
<div class="row justify-content-center">
<div class="col-md-6">
<h4 class="mb-3 text-center">💬 Live Chat</h4>
<div id="chatBox" class="chat-box mb-3">
<!-- message -->
</div>
<form id="chatForm" class="d-flex">
<input type="text" id="chatInput" class="form-control me-2" placeholder="Message...">
<button type="submit" class="btn btn-primary">Send</button>
</form>
</div>
</div>
</div>const chatBox = document.getElementById("chatBox");
const chatForm = document.getElementById("chatForm");
const chatInput = document.getElementById("chatInput");
chatForm.addEventListener("submit", function(e) {
e.preventDefault();
const message = chatInput.value.trim();
if (message !== "") {
addMessage(message, "user");
chatInput.value = "";
// reply message
setTimeout(() => {
addMessage("Hello, this is auto reply from bot 🤖", "bot");
}, 1000);
}
});
function addMessage(text, sender) {
const msgDiv = document.createElement("div");
msgDiv.classList.add("chat-message", sender);
const bubble = document.createElement("div");
bubble.classList.add("bubble");
bubble.textContent = text;
msgDiv.appendChild(bubble);
chatBox.appendChild(msgDiv);
chatBox.scrollTop = chatBox.scrollHeight;
}
JavaScript Tutorial
2025-12-22 03:34:29